
What you
need:
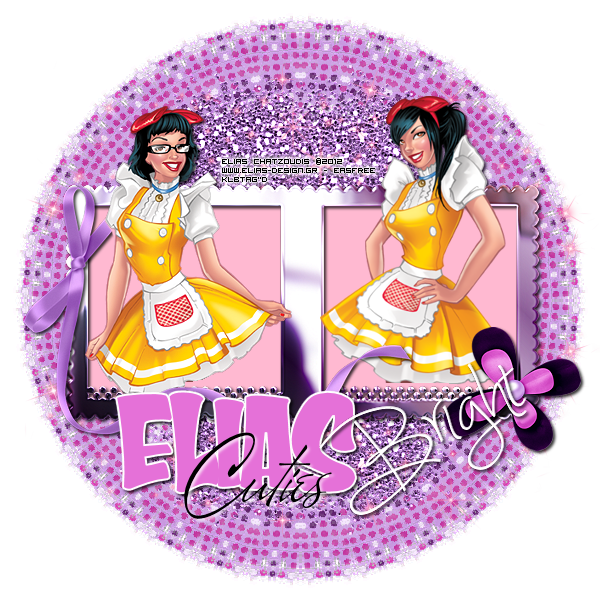
Tubes of
Choice, I am using the gorgeous new free tubes by Elias Chatzoudis. You can find them here
Manipulated by Magik Skull Candy, you can find it here: here It is a pay to use kit, but sooo worth it!
Mask by me you can find it here
Eye Candy
4000, Gradient Glow
VM Distortion here
A Script
Type font and a Block font
This
tutorial assumes that you have working knowledge of Paint Shop Pro and it’s
tools. This tutorial was written by
Valerie Atwell of KLBDesignz, on August 12, 2012.
You may not copy it, distribute it or claim it as your own. I do not allow translation of my
tutorials. You are welcome to include a
link back to my tutorial for your groups and forums. If this tutorial resembles any other in
existence, it is purely coincidence.
Let's get started!
Open Frame 4. Copy and paste as a new layer. Shift + D to duplicate. Close the Original.
Image, Canvas Size, 600x600
Image, Resize, 85%, Resize all layers unchecked
Adjust, Sharpness, Sharpen more. Add a drop shadow, 2, 2, 80, 4.
Grab your magic wand tool. Default settings. Click inside the center of one side of the frame. Selections, Modify, Expand by 10.
Floodfill with a color of your choice or paper of choice. Select none. Duplicate, then Image, Mirror
Add a new raster layer. Move to the bottom. Open a paper of choice. Selections, Select All. Copy and Paste Into Selection.
Go to Layers, load the DirtyGirl Mask or a mask of choice with Invert Transparency checked. Merge Group. Adjust, Sharpness, Sharpen more.
Effects, Plugins, VM Distortion, Kaleidoscope these settings: 128, 128, 0
Open 2 of your tubes. Copy and paste one tube as a new layer, resize as necessary and move to the left side of the frame. Adjust Sharpness, Sharpen.
Duplicate the tube and move the original under the frame. With the eraser tool erase the bottom part of the tube just to above the bottom of the frame.
Now erase the top tube to to the dots on the frame. Be sure to erase enough so that the dots are showing again. See my example for reference.
Add a drop shadow to the bottom tube.
Repeat the process with the second tube.
Now let's add some goodies!
Open Bow 2. Copy and paste as a new layer. Resize by 85%. Adjust, Sharpness, Sharpen. Add a drop shadow. Move it to the left of the frame. The tail of the bow is going to be in front of your tube, so you will need to erase some of it. Use your zoom tool to get a close up to help you erase it better. Set the eraser to the size you want and use a hardness of 50. I used the round shape as I think it is best for getting along the edges. Erase until you are satisfied.
Open Flower 2. Copy and paste as a new layer. Resize by 60%. Adjust, Sharpness, Sharpen. Add a drop shadow. Move it to the bottom right corner of the frame.
Open the Glitter Spill. Copy and paste as a new layer. Adjust, Sharpness, Sharpen more.
Duplicate, Image, Flip. Merge Down. Move this layer to just above the mask layer.
Open the Sparkles. Copy and paste as a new layer. Duplicate, Image, Flip. Merge Down. Adjust, Sharpness, Sharpen more. Rename this layer Sparkle.
With your eraser tool, erase any sparkles that are outside of the mask layer. Tip: I added a dark layer as the bottom layer to help me see the sparkles. I just toggled it invisible after I was done.
Optional: to give the sparkles a little color, grab the Change To Target brush 
I decided that I wanted them pink, so I used a little bit darker shade of the pink that I used for my frame background. Click away until you are satisfied with the color saturation.
For the Word Art: Choose a thick block font. Type out ELIAS in all caps in a contrasting color from the ribbon. I used a pink shade from the flower. Drag the nodes to the size you want. Convert to raster layer. Apply Eye Candy, Gradient Glow with these settings: Color; Medium, white, 2 color stops at 100 and one color stop at 0. Size 14, Soft Corners 0, Opacity 100. Add a drop shadow.
Choose a script font. Write out Cuties in black. Position it over your block word. Add a drop shadow with the previous settings but use white as the color.
Add your copyright and design credit.
Choose another script font. I did a rotate on mine at 25. Add a glow or drop shadow if you choose. Save as a PNG so that you have a transparent background.
I hope you enjoyed my tutorial! Thanks for stopping by.
No comments:
Post a Comment